Beyond Normal User Maintenance

Flute History and Instrument Purchase

Moderators: Classitar, pied_piper, Phineas

User avatar
jmdewey60
Posts: 107
Joined: Mon Oct 18, 2010 9:14 pm
Location: Southwest Florida

Beyond Normal User Maintenance

Post by jmdewey60 »

You may not want to try this at home, especially on a flute less than 5 years
old and possibly still under warranty, or is especially expensive, or rather
fragile. I can not advise anyone about doing your own work, but laying out
my own personal experience. I do have a long background of doing technical
work as a profession so I am not daunted by mechanical problems. I have
developed a healthy respect for things and not messing with things better
left alone. (Such as the pins on some of the rod ends)
I would like to make a warning before proceeding, that pads are not centered
exactly so do not loosen a pad retaining screw unless you are going to replace
them with new ones because once you loose the alignment they have, they
will never seat right again.
Image
Before taking out a rod or screw on the key mechanism, there are springs that
have to have their tension relieved. Here I have a tool made from an ordinary
paper clip where I left most as-is, for a handle, and straightened part out, and
bent the end over into an L shape. I use that to hook around the spring, close
to the little spool shaped structure on the key, as you can see if you look
closely at the photo. (far left of photo, below the tool end) I just move the
spring enough to barely clear the lip on the spool.
Image
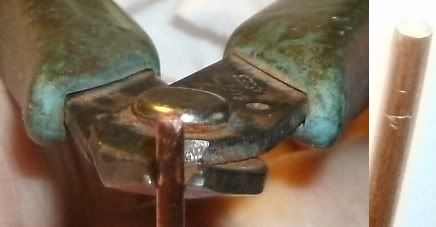
I made a cleaning tool out of 10 gauge copper wire. I have one end curled up
for a handle.
Image
Ordinary cutters leave a sharp pointed end. Here is pictured a pair of flush
cutters made for cutting copper only, that's because the cutting edge is very
thin and steel will ruin it. Flush cutters are flat on one side, thus the name.
I placed it on the wire with the flat side towards the tool piece and worked
my way around it, cutting a little bit at a time, to get a nice flat end, which
I am showing at the right of the photo. I sanded it to make sure there are
no burrs or sharp edges.
Image
I cut little rectangular pieces from my cleaning patches and could push it
though with my copper wire tool to clean out the old dirty oil.
Another warning is that the ends of some rods are held by short screws
through the posts. Wear patterns will develop in the pivot points between
the screws and the rod. Do not mix them up or you will double the wear,
having to create a new pattern. So do not even take the screw all the way
out if you can help it, and leave it in the hole where you found it, to make
sure it does not get switched.
Image
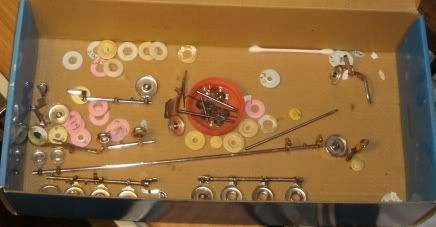
To not loose any parts, I keep them in a box and the smaller pieces I put in
a smaller container, also in the box. I am doing the pads on this silver body
vintage Armstrong. Parts like the body and foot I am keeping separately to
keep from possibly getting scratched.You might notice that I labelled all the
shims to where they came from.
User avatar
jmdewey60
Posts: 107
Joined: Mon Oct 18, 2010 9:14 pm
Location: Southwest Florida

Re: Beyond Normal User Maintenance

Post by jmdewey60 »

Here's a couple posts that I moved from another thread
where they were not, strictly speaking, on topic.
These will explain why I started on this project which
this thread is attempting to describe.

I have two 60's era flutes I have bought recently, an Artley
and a Armstrong. I would guess that the pads were installed
using the wet method, my rationale based mostly on that they
were ordinary production, and not professional rated, models.
One was still in literally mint condition, the other in very fine
condition, which I would take as having been used for a while,
then stored away for a number of years, maybe a lot of years.
Earlier in this thread mention was made to the affect that over
a period of time, a flute not being used for long enough, the pads
that were installed wet will revert back to their original shape.
Now these flutes being in undamaged condition do not have
obvious pad tears or deterioration, so according to what I took from
some posts on this thread, they could, with use, get back into
playing shape, meaning they will re-break in, to make a decent
enough seal.
I believe this is what I am observing with these two flutes, that they
are improving with use. My advice to someone who finds themselves
in a similar situation, with a flute that looks good but does not play
so well, to before tossing out the pads, trying playing it for a couple
weeks at least to see if their sealing ability will come back.

Concerning my above post, it would be applicable only after a
close inspection. Last night I became suspicious of the latest
flute I have gotten because it would sound great one second,
then sound like I had left a swabbing rag in it, the next.
I took the keys off to have a better look and there are a couple
pads where if you touch them, you can see that the membrane
had separated from the felt. I mean it is there, but apparently
only connected at the cardboard backing. I think it is time to
change them, so, experiment ended, on this flute.
Update: ordered I suppose "natural" pads, since they do not say
synthetic in the description. Over on the "Winds, Nice Flutes for
Low Price" thread, the guy was saying their flutes were being made
with Pisoni pads. Well, JL Smith sells what they call Lucien pads
made by Pisoni. Yellow seems to be the trendy thing but I went
with white to be like the original, on this Armstrong. (at least the
felt itself is white, I think the membrane turns yellow naturally)

User avatar
jmdewey60
Posts: 107
Joined: Mon Oct 18, 2010 9:14 pm
Location: Southwest Florida

Re: Beyond Normal User Maintenance

Post by jmdewey60 »

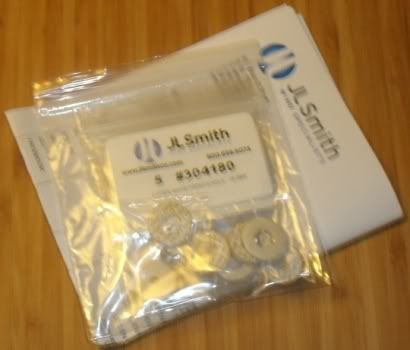
After two months and a week, UPS brought my new pads.
Here's what came in the box, other than foam peanuts:
Image
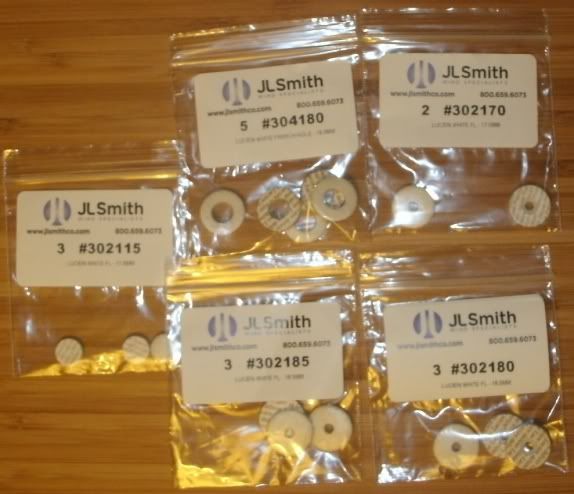
Here's how they put together my order, to print labels and put whatever
it says on the label, in the bag. So, this is enough to do this one flute.
Image

User avatar
jmdewey60
Posts: 107
Joined: Mon Oct 18, 2010 9:14 pm
Location: Southwest Florida

Re: Beyond Normal User Maintenance

Post by jmdewey60 »

Putting the new parts on and putting it back together is something
that is minor compared to what comes after, which is adjusting
everything to get the keys to seal properly. So I thought I should
record that in fact the flute was put all together yesterday. It took
more work taking it apart. One reason being the fact that it is an
open hole flute and that means there are these thin metal sleeves
that are a short cylinder with a rolled edge on one end, that slides
in between the big hole in the middle of the pad, and the chimney
built into the center of the key. You can't just find replacements for
them so you have to be super careful about not ruining them when
you take them off. What I did was destroy the pads where they sat.
I'm sure that's not the way you are supposed to do it. They make
little lever tools that are rounded inward at the ends, to catch the
rolled end and I guess you would use two, one on each side, and
evenly pry them up. I just got the pads out of the way to get at the
sleeves from underneath and just used two screwdrivers. That only
works if you do not intend to re-use the pad. I don't really see how
you could anyway, or why you would want to remove one unless
you were going to replace it. Anyway, quick and easy to put the
sleeve back on. One thing I wish I realized beforehand, they are
kind of sized to a particular chimney so figure out a way to keep
them matched, like putting on part way once the pad is off.

User avatar
jmdewey60
Posts: 107
Joined: Mon Oct 18, 2010 9:14 pm
Location: Southwest Florida

Re: Beyond Normal User Maintenance

Post by jmdewey60 »

I don't want to wreck someone else's thread with some off
topic info so I will include this little blurb here, on flute cleaning.
I may have suggested this in another thread but I may want to
emphasise it a bit, based on my own experience using it.
3" X 3" Cotton Patches. Buy the bulk pack, comes with 225.
They are small and if it gets a tiny bit dirty, throw it away
and not feel bad. I keep a small pile of them right in front of
me in my desk drawer, handy for all cleaning chores.
Last night I used one to clean my glasses with, the reason
being, I can not tolerate normal lens cleaning paper and use
unscented toilet paper to soak up the Flents Wipe n Clear
eyeglass lens cleaner that I spray straight onto the lens, and
rub it around a bit to break up what I imagine is fine particles
of oil that rub off from the tips of my eye lashes. The paper
leaves real fine lint and before it completely dries, I can rub it
with one of these patches. You can feel the difference of the
weave on one side or the other, so put the smoother (just like
the t-shirt you are wearing right now) side towards the lens
and it leaves no lint at least that is visible. Do the same thing
on your flute, which is always be aware of the orientation of
what side is facing the material, whether it is on the end of the
cleaning rod, going inside, or at your fingertips on the outside,
cleaning the fingerprints off.
Here's another little tip that probably no one else would want to
do; which is I roll two of the patches together to put into the
slot on the cleaning rod, and for the first push, when it may be
wet in there, take another patch and fold it onto a quarter size,
and poke the center of that a bit with my finger, into the the
lower end, then put the rod end into that little depression, and
shove it up. (Always have those patches in the slot too, no
matter what because that is what keeps the rod off your flute)
Don't worry if it comes loose, just push it back up, and grab the
patch through the mouth piece opening. Oops, that's for cleaning
while still together, since I am avoiding taking it apart more than
I have to. Also, while on the subject, yes I am still using the
aluminum rod and like it more than ever. Anyway, I have a small
pair of needle nose pliers to grab the errant patch through the
hole, and that is not difficult avoiding even touching any silver.
Just have one that fits. You may think, "But those are for gun
cleaning!" So? They aren't pre-impregnated with some sort of
gun solvent or something. Just straight out of the cutter
at the cloth factory and stuffed in a bag in four stacks. They are
white so you can see the tarnish from the silver. I read on a car
care web-site for extra finicky car owners, this guy saying never
use t-shirt material on your car because it is equal to 4000 grit
sandpaper. That actually sounds good to me, and I think about
that while polishing my liberally varnished violin. Micro-fiber is
the big thing now but let me tell you, that actually is a method
for reducing the thickness of varnish on a violin, so keep that
in mind before ever putting it on your silver (not me, thanks).
Update (12/23/10): there is a 4000 grit paper that people
use for polishing guitars, called MicroMesh. So I doubt that a
t-shirt could be the equivalent, otherwise how could they sell
something like that? My point being, don't worry about using a
gun cleaning patch to clean your flute, because that is what it
is, basically, a very fine tight woven material done in the style
of a t-shirt weave. Just replace them often so dirt is not being
an embedded abrasive. That's why you buy 'um by the bag.

User avatar
jmdewey60
Posts: 107
Joined: Mon Oct 18, 2010 9:14 pm
Location: Southwest Florida

Re: Beyond Normal User Maintenance

Post by jmdewey60 »

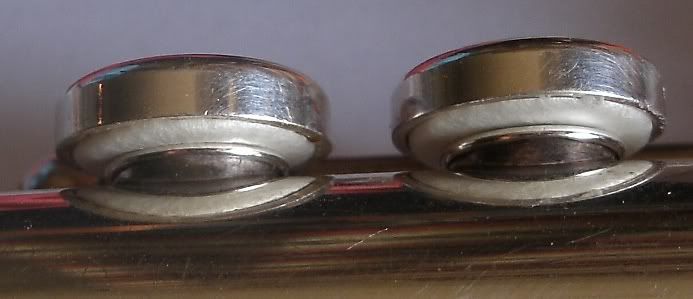
I figured out how to get my camera to take macro shots,
so now I can show what is going on with this re-pad job.
The trill pad on the left looks good, but the one on the
right is not sealing because of this little space in the front.
Image
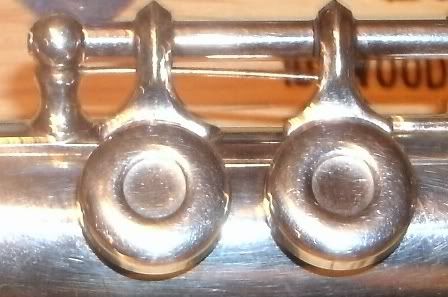
This is maybe the root cause to the problem that caused
me to take the flute apart to start with. Something
happened to the flute previous to me owning it, where the
mechanism for this key got bent. That was evident by the
actual finger button being pushed down close to the body
so when you push on it, the pad only moves to make a
small opening.
My problem is that the only way I can see to get this pad
to seal right is to somehow bend the little arm attached
to the pad cup. there is hardly any arm length between
the pad cup and the pivot point on the long rod that goes
down to the finger button. The trick is to figure out how
to bend it without ruining either of those parts.

fluteguy18
Posts: 2311
Joined: Sun Jul 16, 2006 3:11 pm

Re: Beyond Normal User Maintenance

Post by fluteguy18 »

If you haven't already, I highly recommend reading l. Burkart's book about flute repair. You shouldn't bend anything unless it is bent in a 'damaged' way. You should be putting these pads in with an adhesive made of solid shellac (that is then melted with an alcohol burner). You just sort of... float the pads in. These trill pads should be sort of... in a pool of shellac in the key cup, and when melted, they should move quite freely.

This is not a matter of a bent key. And you don't just put pads in regular key cups either. They won't seal correctly the first time. They must be shimmed to make a perfect seal.

User avatar
jmdewey60
Posts: 107
Joined: Mon Oct 18, 2010 9:14 pm
Location: Southwest Florida

Re: Beyond Normal User Maintenance

Post by jmdewey60 »

Seeing how I have other flutes, I am in no hurry to do anything too drastic right away.
Also I should add that this is the nicest flute that I own, being with a silver body and all
that, to where, when it works, has such a sweet tone, so I don't want to ruin the thing.
Thanks for commenting and my own commentary would be rather incomplete on its own.
I think what you are saying is to use a heat sensitive adhesive where it can be heated
to move the pad a bit. There was shellac in the cups when I took the old pads out.
I carefully scraped all that out so it would not affect the tilt of the new pad.
I probably made a big mistake using epoxy to put the new pads in with.
There was no shims in these trill key cups.
Not sure what you mean by "regular".
I do think it is damaged.
I don't think it would have to be bent very much. Just a tiny bit.
Over on a different flute forum, I read this one old thread of a guy who was doing
his own pad job but the thread mysteriously never got further than getting the pads
in the mail, or some time soon after.
I don't want to do that, and if I have some horrible problem, I should talk about
that as part of the story.

User avatar
cflutist
Posts: 447
Joined: Sun Oct 08, 2006 12:44 pm

Re: Beyond Normal User Maintenance

Post by cflutist »

Yes, the book FG18 is talking about is The Complete Guide to the Flute and Piccolo by
James Phelan and Lillian Burkart

I have the second edition, but there might be a newer version out?

User avatar
pied_piper
Posts: 1962
Joined: Sat Mar 31, 2007 1:31 pm
Location: Virginia

Re: Beyond Normal User Maintenance

Post by pied_piper »

Shellac is still used on many sax pads, but these days, most flute makers and repair techs use more modern hot melt adhesives to float the trill pads. Shellac tends to be brittle and does not work well in very cold areas. The newer hot melt glues (not the same as used in hot melt glue guns) are more stable and hold pads better over a wide range of temperatures and environments. But, the floating technique is essentially the same regardless of the type of adhesive used.
"Never give a flute player a screwdriver."
--anonymous--

fluteguy18
Posts: 2311
Joined: Sun Jul 16, 2006 3:11 pm

Re: Beyond Normal User Maintenance

Post by fluteguy18 »

jmdewey60 wrote: Image
I would NOT try to bend the key. You would risk not only bending it to a point where it is worse, or could even cause irreversible damage. (And from looking at the angles of the curves of the key cups in relation to the tubing **the geometry**, they definitely don't look bent to me... and those two keys sealed before you took it all apart... didn't it?!)

Furthermore, look at the pads themselves. In this picture, the pad on the left is sitting lower than the pad on the right. You can also see little beads of epoxy on the rim of the key cup on the right key. This indicates that it is pushed in further than the one on the left. The key isn't bent. The pad is incorrectly installed/misaligned.

If you haven't read that book, you SERIOUSLY should. It addresses flute maintenance and repair at a very detailed and involved level. I think that to continue this project without consulting it would be a bit irresponsible. JUST MY OPINION. Not meaning to be rude, but rather to point out that this instrument is an investment, and you should be doing everything in your power to make sure that you're doing it all correctly. It would be a shame to cause several hundred dollars worth of professional repairs (or worse) because you didn't take the time to buy a $40 book that could have prevented it. I've held off from commenting on this thread for this very reason.

And, just as an FYI, every tech that I have talked to, every book I've read, and every forum I've posted on about flute repair... they all say the same thing: don't bend/adjust metal if you don't have to. This is one of those instances. A pad adjustment will fix this leak. Your problem now is how to get the epoxy out once you rip the pad out.


What I meant by 'regular' was that the pads are held in by bushings/grommets (open holed keys) or by washers with screws.

User avatar
jmdewey60
Posts: 107
Joined: Mon Oct 18, 2010 9:14 pm
Location: Southwest Florida

Re: Beyond Normal User Maintenance

Post by jmdewey60 »

fluteguy18 wrote: A pad adjustment will fix this leak. Your problem now is how to get the epoxy out once you rip the pad out.
Here's a top view of those pad cups.
Image
They have dimples in what would be the bottom of the cups if you were looking
at it while apart. What it makes me think is that these dimples will allow the pad
to rock one way or the other, without there being one particular angle that
would be a natural resting place for it.
So what you propose is to maybe put some glue in the cup, then place the pad
in it while assembled and letting the spring pressure level the pad where it rests
evenly on the lip of the tone hole? That's what I am getting from what you seem
to be implying.
Looks like I need to order a replacement pad from JL Smith.
Also they have the right kind of glue I should buy, and I need some cork and some
felt that has gotten too thin, that I need to replace. Maybe some new shims too.
Last edited by jmdewey60 on Wed Jan 12, 2011 11:06 am, edited 1 time in total.

fluteguy18
Posts: 2311
Joined: Sun Jul 16, 2006 3:11 pm

Re: Beyond Normal User Maintenance

Post by fluteguy18 »

That's exactly what I'm saying. That's the proper method (or at least what seems to be the most common method) for installing these pads. Let the spring tension level the pad while the glue is hot. It may require a little bit of encouraging with some finger pressure on the key cup and a needle (to help move the pad around).

User avatar
pied_piper
Posts: 1962
Joined: Sat Mar 31, 2007 1:31 pm
Location: Virginia

Re: Beyond Normal User Maintenance

Post by pied_piper »

JMD60 - I too, suggest that you avoid bending the key and should replace the pad and reinstall a new one by floating it in with a good hot melt pad adhesive. To get the pad out that you have epoxied in place, remove the trill key and gently heat the pad cup with a small flame until it loosens so that you can pry it out with a needle. An alcohol lamp is great for that (don't use a propane or oxy-acetylene torch - they're much too hot). The alcohol lamp is not expensive ($6-12) and the denatured alcohol fuel can be purchased at any paint store or hardware store. You'll need it anyway for the hot melt glue:

http://www.jlsmithco.com/GENERAL-BENCH- ... GLASS-3-OZ
http://www.musicmedic.com/catalog/produ ... st350.html

For the proper glue to reinstall a new pad, try the amber melt glue or George's glue. Both are good and available from JL Smith:

http://www.jlsmithco.com/PADDING-ADHESIVES

I also agree with the recommendation that you get a book to help you learn non-destructive techniques for flute padding. The Phelan-Burkhart Complete Guide to the Flute is an excellent book, but I feel that it is geared more toward the professional flutist and repair tech. For someone new to flute repair, I highly recommend Jeff Smith's book "Servicing the Flute". It is an introductory book that provides complete step-by-step instructions and photos along with each step.

http://www.jlsmithco.com/BOOKS/SERVICIN ... JEFF-SMITH
Last edited by pied_piper on Wed Jan 12, 2011 4:25 pm, edited 1 time in total.
"Never give a flute player a screwdriver."
--anonymous--

User avatar
jmdewey60
Posts: 107
Joined: Mon Oct 18, 2010 9:14 pm
Location: Southwest Florida

Re: Beyond Normal User Maintenance

Post by jmdewey60 »

pied_piper wrote:I also agree with the recommendation that you get a book
to help you learn non-destructive techniques for flute padding.
I'm going to start making a list of stuff to order.
I tend towards the idea of properly equipping myself seeing
how I have a thing about buying used flutes off internet
auctions. Ones needing work go for ridiculously cheap.

(Oh yeah, and a little off topic on this forum but the alcohol
lamp I was going to get anyway for rehairing violin bows.)

Post Reply